Why Is It So Hard To Use Gmail for Customer Support? (And What To Do About It)
As small businesses grow, they often find that their trusty Gmail setups struggle to keep up with increasing customer demands.
What started as a simple, cost-effective tool has become a roadblock. Your inbox is overflowing, your team is juggling multiple conversations, and important customer issues are slipping through the cracks. It’s a common growing pain, but that doesn’t make it less stressful.
So let’s explore the reasons why you might be struggling with Gmail for customer support, and discuss some alternatives that may better suit your growing business’ needs.
Scalability Issues
Remember when you first started using Gmail for customer support? It was simple, right? A few emails a day would get the job done.
But now, it’s a whole different ballgame. Your inbox is a mess. It’s not your fault though—your business is growing, and that’s great!
But with success comes more customers, more questions, and way more emails. Suddenly, finding that one important message in your inbox takes up more time than you’d like. Other inquiries are missed, or replied to in a less-than-prompt fashion.
Here’s what you’re probably dealing with:
- Email overload. Your inbox becomes a cluttered mess of new inquiries, ongoing conversations, and resolved issues. Important messages get buried, leading to delayed responses and unhappy customers. Not to mention: your inbox might be flooded with emails that aren’t even from customers.
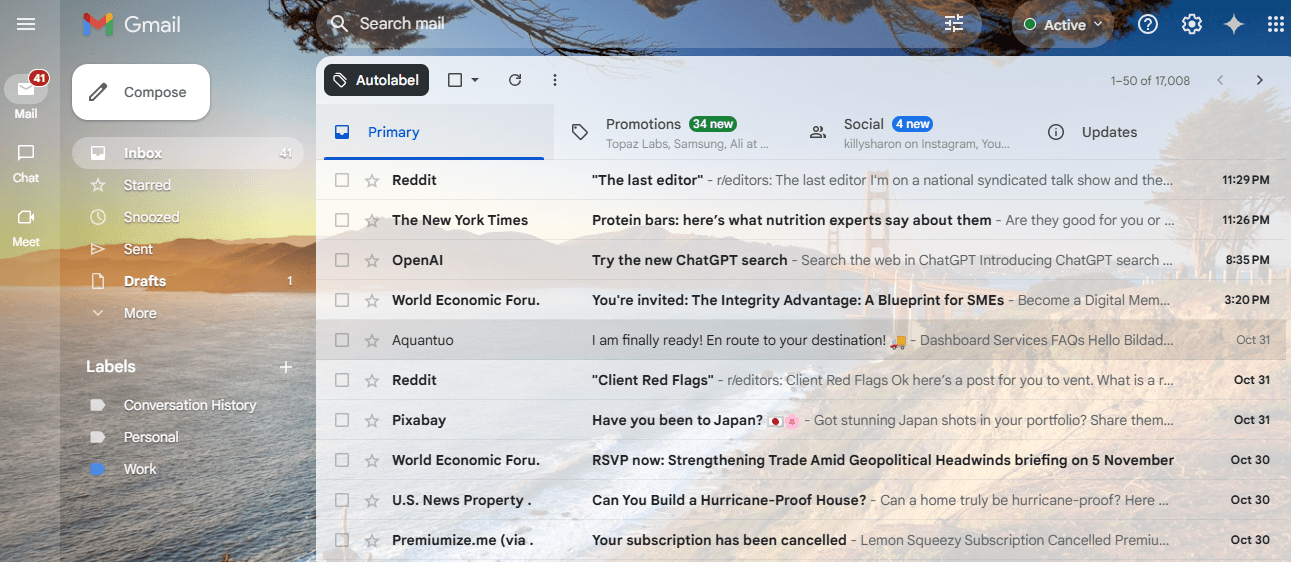
- Conversation tracking nightmares. Gmail wasn’t designed to manage complex, ongoing support conversations. Trying to piece together a customer’s history from various email threads is time consuming and prone to errors.
- Multiple inboxes and labels chaos. If you’ve tried to get organized by creating multiple inboxes or labels, you’ve likely found that it only adds to the complexity. Switching between views and ensuring that nothing falls through the cracks becomes a full-time job in itself.
- Inconsistent response times. Without built-in tools to track response times, ensuring timely replies becomes a guessing game. You might think you’re on top of things, only to discover a week-old email that never got a response.
The hard truth is this: Gmail wasn’t built for this kind of heavy lifting. It’s great for personal emails, but when it comes to managing customer support for a growing business? You’ll be struggling to keep up with the demands for a long time.
Collaboration Roadblocks
As your business grows, chances are you’re not handling customer support alone anymore. Sadly, you’ll soon discover that Gmail wasn’t made for teamwork.
Here are some of the collaboration challenges you’re probably facing:
- Shared inbox management. Gmail’s structure makes it difficult to effectively share access to a single account among team members. This limitation leads to confusion about who is handling which inquiries, and can result in duplicated efforts or, worse, overlooked messages.
- Manual task assignment. Assigning specific emails or tasks to team members is not a native feature in Gmail. This necessitates manual workarounds, such as forwarding emails or using external tools.
- Lack of internal communication tools. Gmail doesn’t provide a built-in system for leaving internal notes or comments on customer interactions. This deficiency makes it challenging to maintain clear communication within your team about ongoing customer issues and complex cases.
- Risk of duplicate responses. Without a centralized system for tracking who is responding to which inquiry, there’s a significant risk of multiple team members replying to the same customer. Naturally, this causes customer confusion and damages your brand’s reputation.
These collaboration roadblocks have real consequences for your business. Reduced efficiency is common, as team members struggle to coordinate their efforts.
You’re also likely to deal with increased response times due to unclear task ownership, and difficulty in maintaining a unified brand voice across all customer interactions
As your support team expands, these issues become more pronounced. What might be manageable with a small team becomes a more significant obstacle as you scale. The lack of proper collaboration tools in Gmail means more time managing communication logistics, and less time addressing customer needs.
Lack of Automation
When using Gmail for customer support, a significant portion of your team’s time is consumed by manual and repetitive tasks that aren’t about resolving customer issues. These administrative processes, while necessary, reduce your support team’s efficiency.
Several manual processes are required to manage customer support effectively in Gmail. They include:
- Tagging and categorization. Manually labeling emails to organize inquiries by type, priority, or status.
- Filtering. Setting up and maintaining filters to sort incoming messages.
- Forwarding. Redirecting emails to appropriate team members or departments.
- Searching. Combing through email threads to find relevant information or previous interactions.
These tasks might seem small, but they add up quickly. Each action requires attention and time that could otherwise be spent addressing customer needs directly.
This often has tangible effects on your customer support quality:
- Slower response times. As agents spend time on manual tasks, customer inquiries pile up, leading to longer wait times.
- Reduced quality of interactions. With less time available for each customer, the depth and quality of support may suffer.
- Agent burnout. Constantly switching between administrative tasks and customer interactions can lead to fatigue and reduced job satisfaction (and poorer service).
- Missed opportunities. Time spent on manual processes is time not spent on improving customer relationships or identifying trends that could benefit your business.
As your business grows and customer inquiries increase, these manual processes become even more burdensome. What might be manageable with a small customer base quickly becomes overwhelming as support volume scales up.
The reliance on these manual processes in Gmail not only impacts your current operations. It also limits your ability to efficiently scale support as your business expands.
Zero Insight into Performance
Gmail falls short when it comes to providing the comprehensive analytics needed for effective customer support management. This limitation leaves you flying blind, unable to accurately measure and improve your performance.
Using Gmail for customer support means you’re missing out on crucial data points like:
- Response times. How quickly are you getting back to customers?
- Resolution rates. What percentage of issues are you successfully resolving?
- Customer satisfaction scores. How happy are your customers with the support they receive?
- Agent performance. How efficiently is each team member handling inquiries?
Without built-in analytics, you may have to resort to manual tracking methods and guesswork. Or you shell out a lot of money for an analytics tool that’s over-complicated and doesn’t integrate with your support inbox.
Either way, finding a solution is necessary. Customer data is vital for making decisions about:
- Process improvements. Where are the bottlenecks in your support workflow?
- Resource allocation. Are you staffing your support team effectively?
- Training needs. Which areas of product knowledge need improvement?
In an era where data-driven decision making is crucial for business success, the limited reporting and analytics capabilities of Gmail put your customer support at a significant disadvantage.
Without these insights, you’re left making important decisions based on gut feelings rather than concrete data. That means a lot of missed opportunities to enhance your customer experience and support efficiency.
What’s the Impact of All This on the Customer Experience?
Customer expectations for support are higher than ever. Buyers demand quick, accurate, and personalized assistance.
All of the above challenges are trouble for your team. And they’re trouble for your customers.
Delays leave them feeling ignored or undervalued. Inconsistencies frustrate them, and undermine their confidence in your company’s professionalism.
The culmination of these issues creates a support experience that falls short of customer expectations. Plus, the impact doesn’t stop at individual interactions.
The ripple effects of subpar support can have far-reaching consequences for your business:
- Increased customer churn. Unhappy customers are more likely to switch to competitors, directly impacting your bottom line.
- Negative word-of-mouth. Poor experiences often get shared, deterring new customers.
- Brand reputation damage. In the age of social media and online reviews, subpar customer support can quickly tarnish your brand image.
- Lost opportunities for customer engagement. Time spent on administrative tasks is time not spent on meaningful customer interactions.
- Decreased customer lifetime value. Shorter customer relationships due to poor support experiences lead to lower overall value from each customer.
- Missed insights for product improvement. Without proper tracking and analytics, you lose valuable customer feedback that drives product enhancements.
As customer experience increasingly becomes a key differentiator, the limitations of using Gmail for customer support put your business at a distinct disadvantage.
So how do you avoid that?
How To Streamline Your Customer Support With Groove
If Gmail is no longer sufficient for managing your customer support, you need a new platform. Ideally, one that’s actually built for this specific purpose.
A help desk is a centralized support system designed for managing, organizing, and responding to customer inquiries efficiently. It houses all communications in one place, and offers features well beyond simple email management.
You may be wary of switching to a help desk. Many popular solutions are expensive, over-complicated, or both. You’re fed up with Gmail, but do you have the time and resources to adopt an entire new system?
That’s why we built Groove, our cloud-based help desk software tailored for small and growing businesses. It’s a comprehensive customer support platform that addresses the limitations of using Gmail for support, and transforms your support operations.
At the same time, it’s more streamlined and easier to adopt than a lot of our enterprise-focused competitors. It gives you what you need, but doesn’t clutter up your workday. And it’s highly affordable for small teams.
Let’s explore how Groove compares to Gmail across some key areas of customer support. That way, you can decide for yourself if it’s the kind of upgrade you’re looking for!
Scaling Your Support
As support volumes increase, Gmail’s inbox becomes cluttered and overwhelming. There’s no centralized system for managing customer conversations across a team, making it difficult to track and prioritize inquiries.
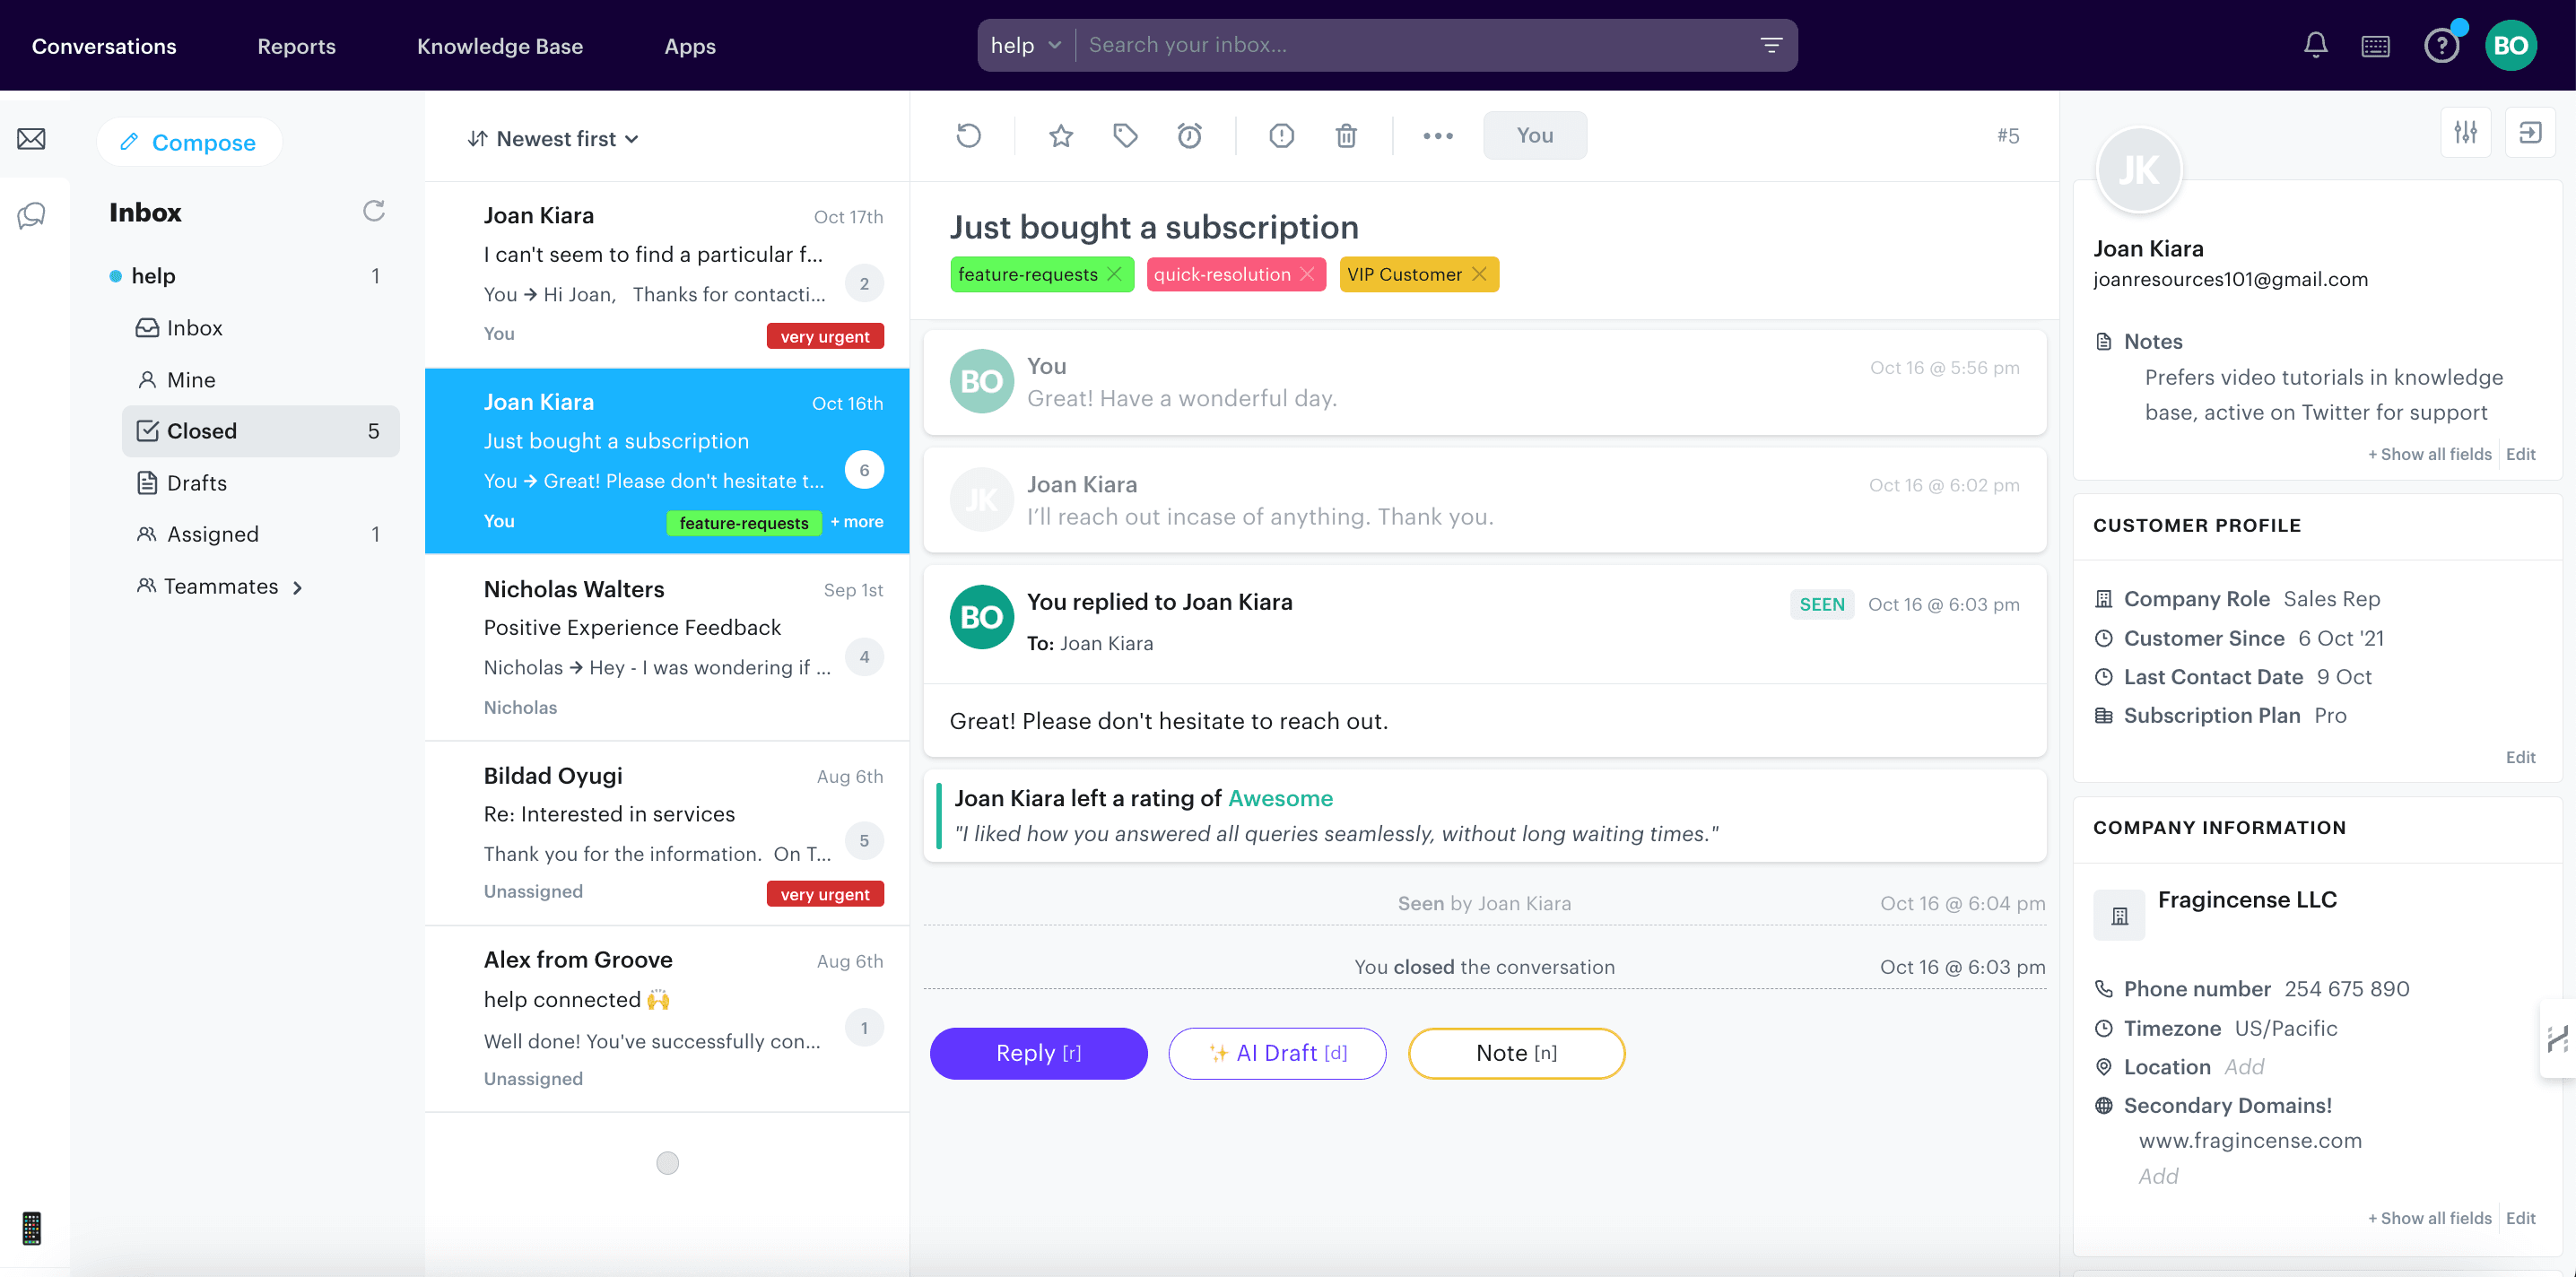
This is where Groove’s shared inbox shines. It centralizes all customer conversations, making it easy to track, manage, and respond to every interaction:
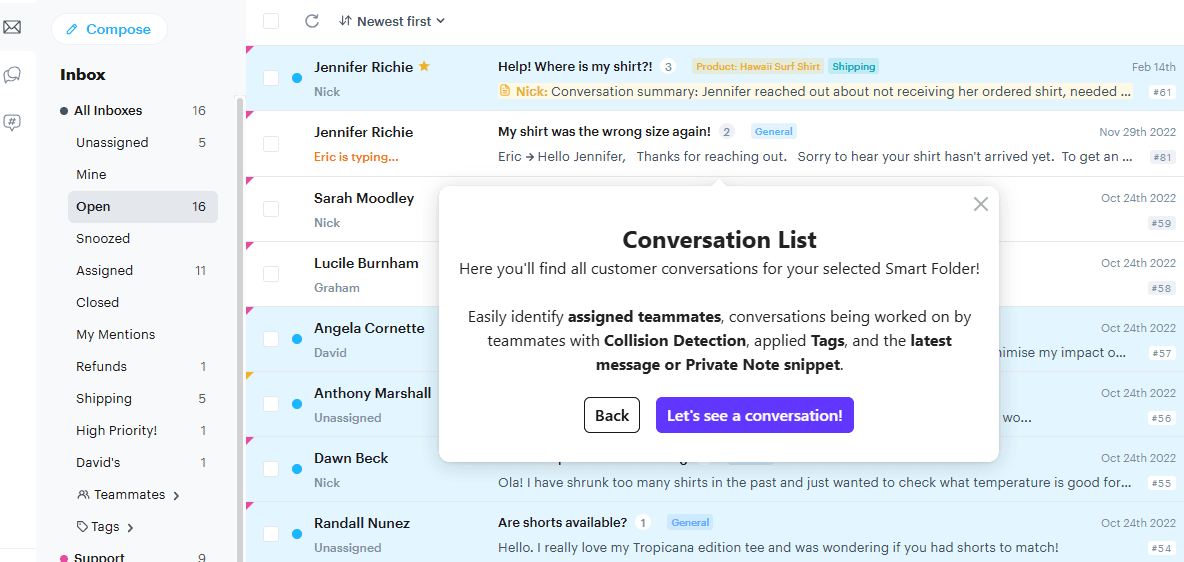
With Groove, you can view all inquiries in one place, easily categorize and assign conversations to specific team members, and track the status of each inquiry.
And we’re not just talking about email. You can pull in customer requests and complaints from live chat, social media, and elsewhere, saving your team the hassle of switching between platforms.
This centralized approach ensures that no message falls through the cracks. As a result, you’ll find it easier to maintain high-quality customer support as you scale.
Streamlining Team Collaboration
Collaboration in Gmail is limited, with no built-in way to leave internal notes on conversations, detect when multiple agents are working on the same issue, or assign tasks to specific team members. Groove offers features that address these limitations.
Our platform provides internal notes for private team discussions about customer issues. Think of it like a streamlined form of Slack built right into your support inbox:
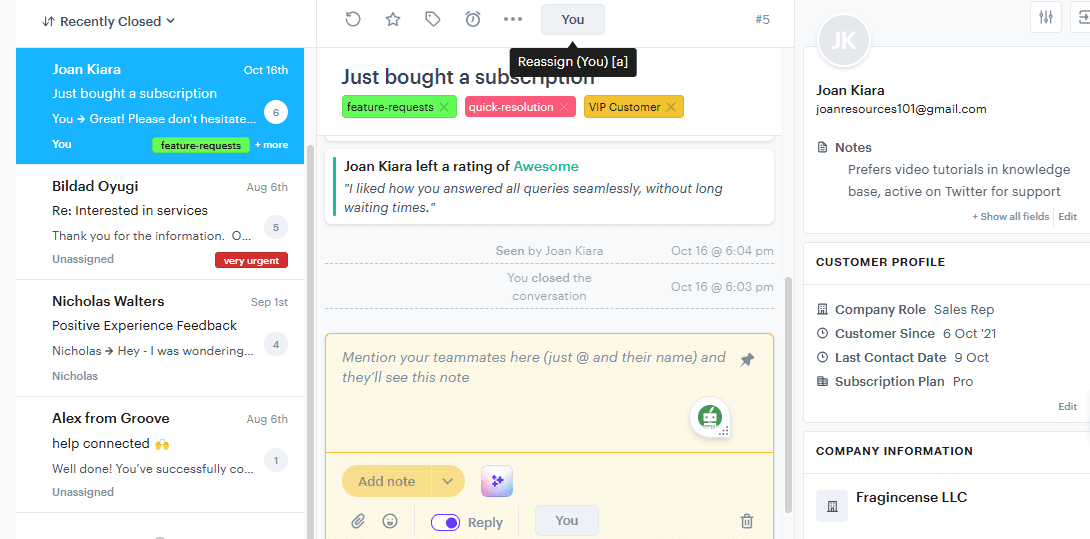
Groove also includes collision detection, to avoid duplicate responses by always making it clear who’s working on what. And you can manually or automatically assign inquiries to specific team members. These tools ensure that your team can work together effectively, no matter its size.
Automating Tedious Tasks
While Gmail offers basic filters and labels, it lacks robust automation for customer support. Most tasks must be performed manually, which can be time consuming and prone to errors.
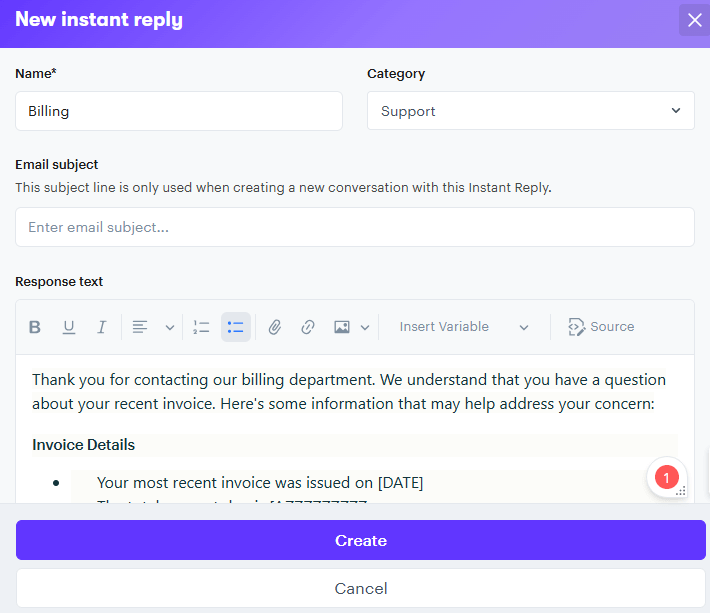
Groove’s automation features significantly reduce this manual work. For example, you can use canned replies to quickly answer common questions with pre-written responses:
Groove’s most powerful automation feature is its custom rules. You can build ‘if-then’ style commands that set up automated workflows for all kinds of tasks.
Rules can be used to route inquiries to the right agents, escalate urgent issues, organize incoming messages, send pre-planned outreach, and much more. You’ll find prebuilt rules for common support tasks, as well as the option to create whatever custom rules you need.
Gathering Actionable Insights
Gmail provides basic email statistics, but lacks comprehensive support analytics. Tracking key performance indicators (KPIs) often requires manual data collection and analysis.
Groove, on the other hand, understands the importance of data-driven service. It tracks crucial KPIs like response times, resolution rates, and customer satisfaction scores, so you know how your team is performing and how customers feel about their interactions.
Plus, all of that is done automatically. You don’t have to set up reports (although you can customize them if you like). There’s no need for prior analytics experience – all the information you need is waiting for you in handy visual displays:
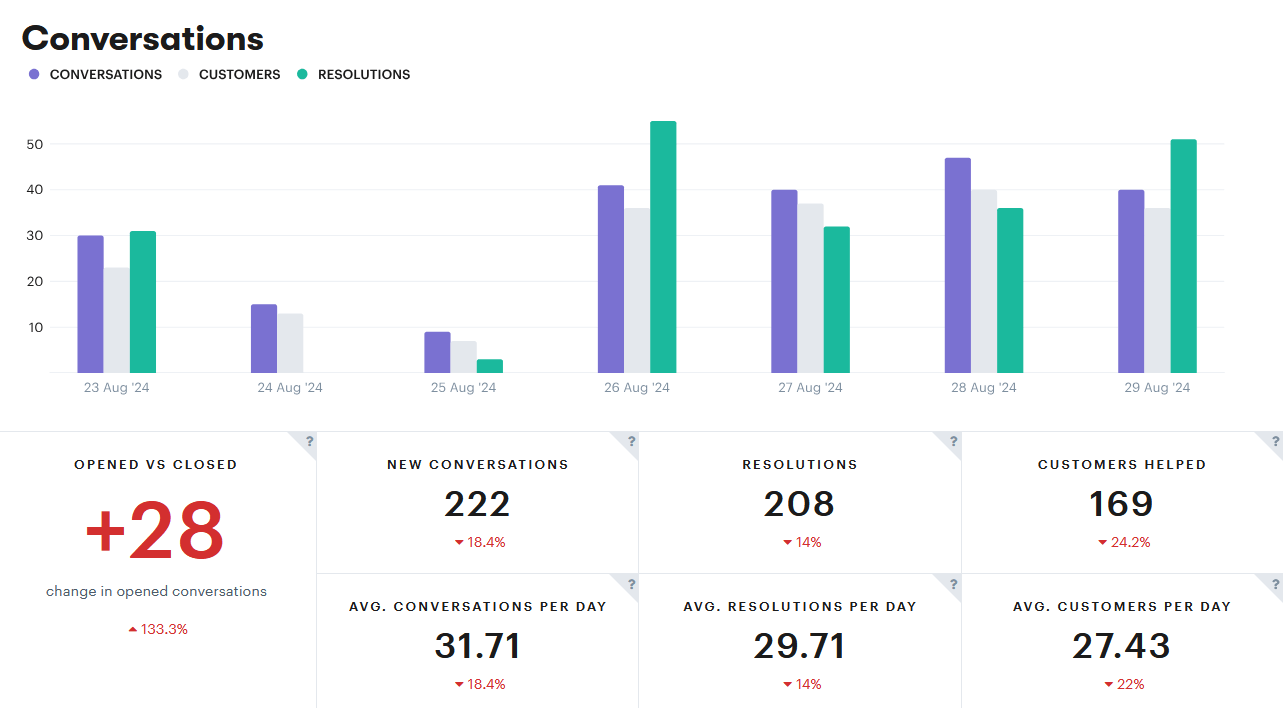
With that information, you can identify areas for improvement, and make data-driven decisions to optimize your customer support.
Empowering Self-Service
Gmail doesn’t offer any built-in features for customer self-service. This means that all inquiries, even simple ones, require direct interaction with your support team.
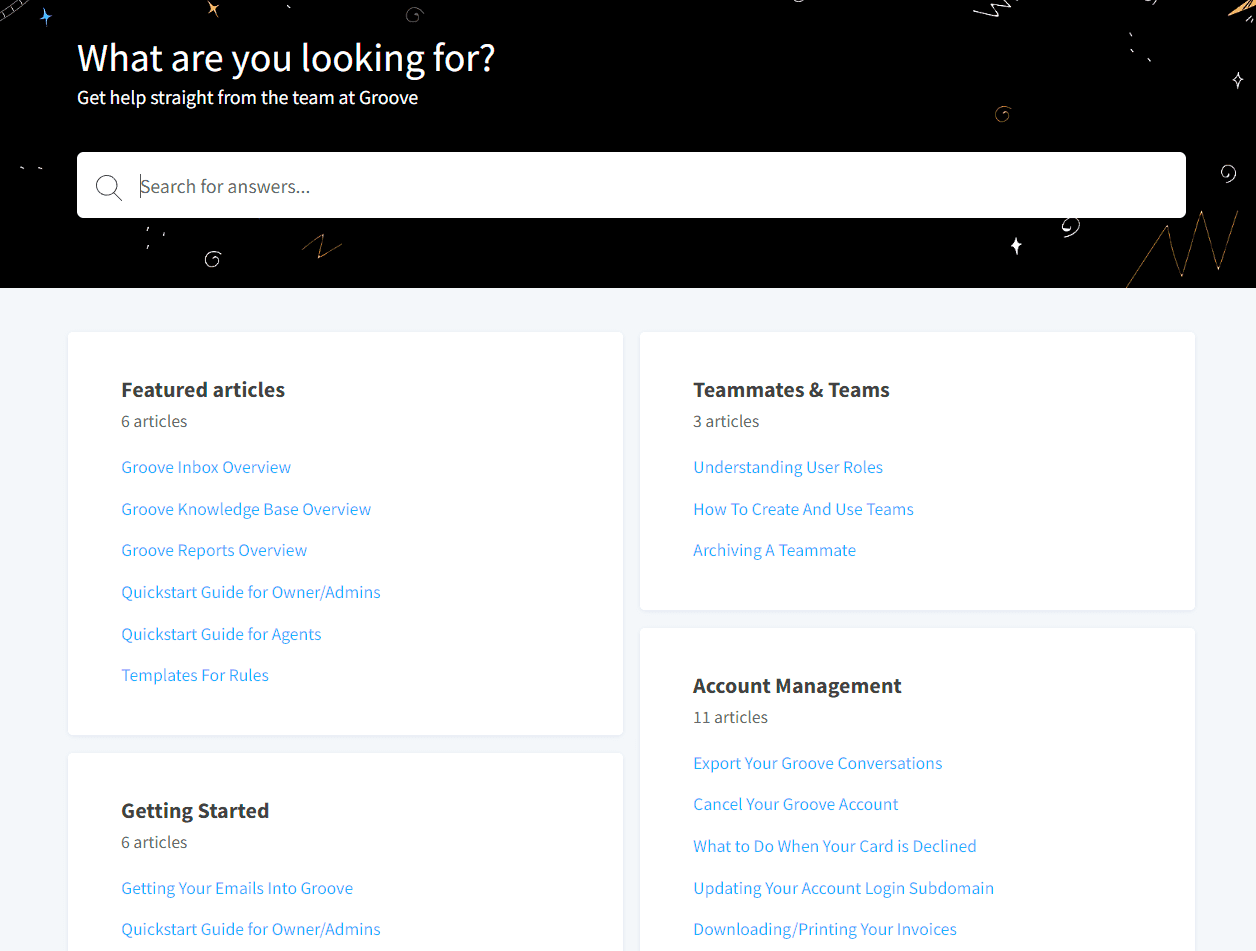
Groove provides robust self-service options to address that gap. Its knowledge base feature allows you to create and maintain a searchable database of common questions and answers. Additionally, the customer portal enables buyers to track their support tickets and find solutions independently.
By empowering customers to find answers on their own (when possible), you free up your team to focus on more complex issues. They can avoid replying to the same simple inquiries over and over, and provide more personalized support where it’s needed most.
How To Transition from Gmail To Groove
If you’re still unsure whether a help desk is right for your team, we don’t blame you. Switching tools is always filled with uncertainty.
You might be wondering: “How do I actually make this change? Is it going to be a headache?”
There’s always some adjustment required. But we’ve made sure that transitioning from Gmail to Groove is as simple as possible. In fact, you might be surprised at how quickly you can get up and running with your new help desk.
Let’s walk through the process together, so you know what to expect!
Getting Your Groove Shared Inbox Up and Running
First, you’ll go to Groove’s official website to sign up for a free trial. After all, you shouldn’t have to commit to a paid plan until you’ve had a chance to get hands-on with the software and see how it feels.
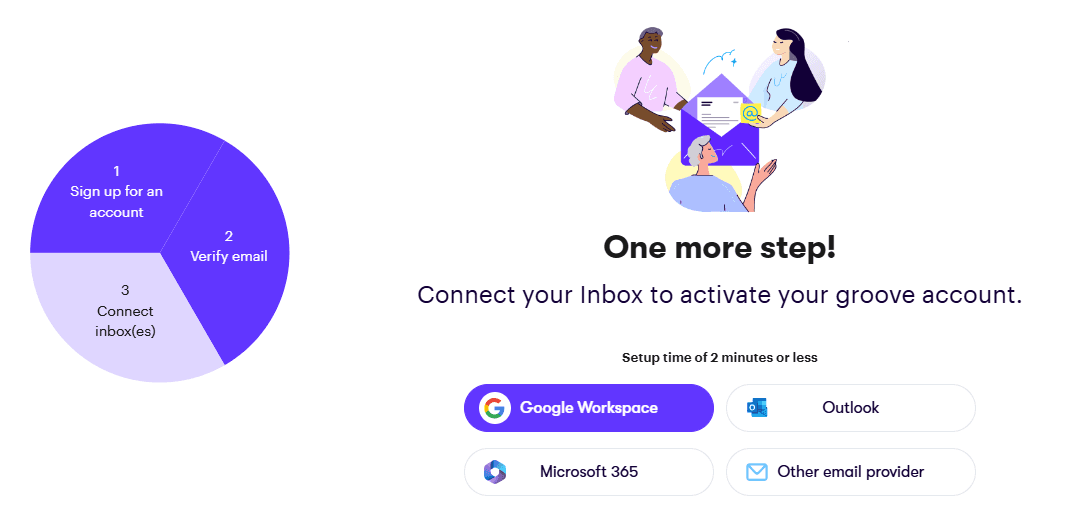
Since you’re transitioning from Gmail, you’ll want to sign in with Google at the prompt. After verifying your email, you’ll connect your current inbox to activate your Groove account:
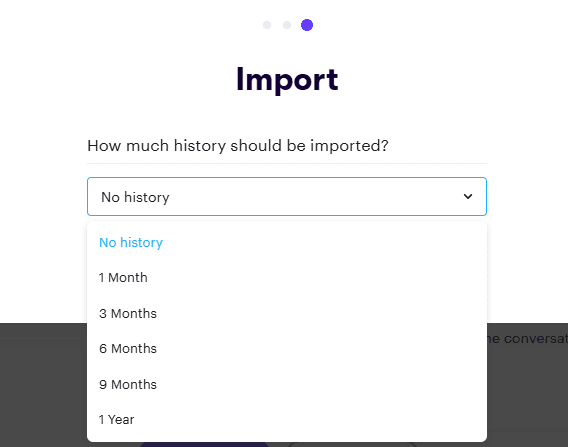
In the next step, you’ll select how much history from Gmail you’d like to import:
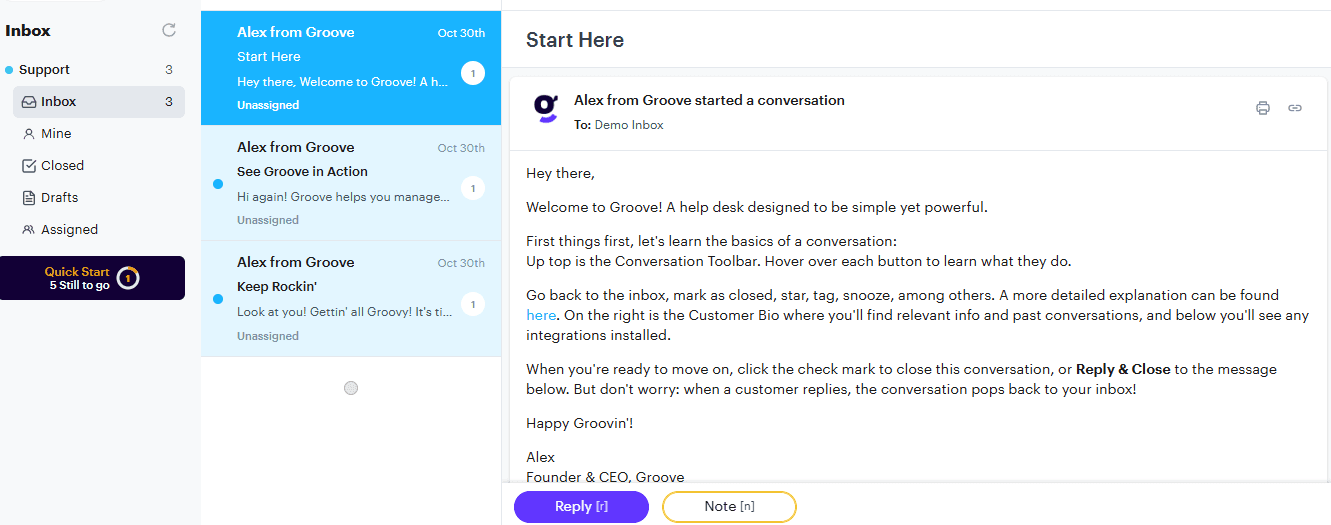
After that, you’ll have access to your Groove shared inbox:
You can repeat the above process to link other Gmail accounts. So if you have multiple support addresses, they can all be funneled into the same place.
Then you can hook in secondary support channels, like live chat and social media platforms. Our integrations are quick to set up, and the result is a wholistic view of everything customer service.
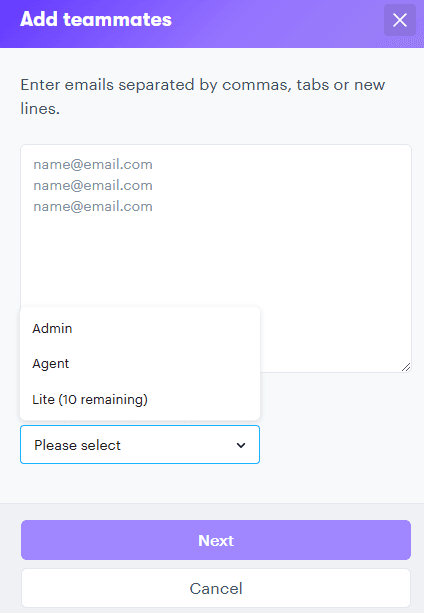
Now, it’s time to bring on your support team under Apps > Teammates, and assign them roles:
Then, with the help of your team, you can discuss what processes you might want to get off your plates by automating them. Still under Apps, scroll down on the left to Rules:
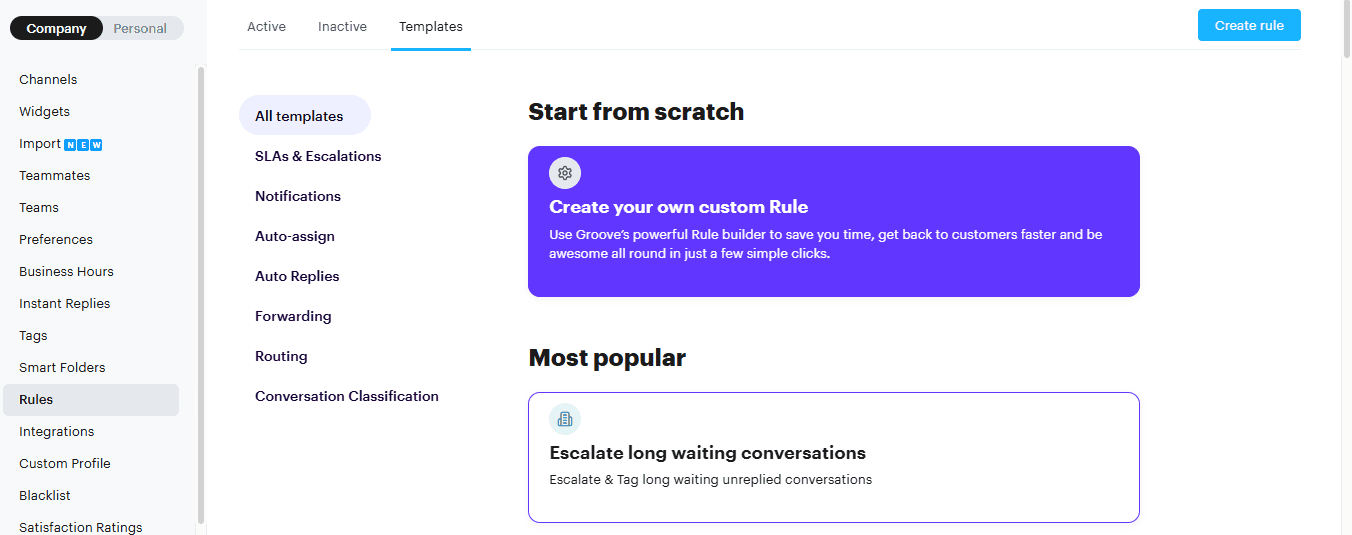
Take a look at the automation templates Groove provides, and see what you’d like to adopt. We’re sure you’ll find a few that will come in handy immediately. Plus, you can build your own rules to align with your preferred workflows.
There’s a lot more, but these simple steps get your team up and running right away. The learning curve is deliberately minimal, and the interface should feel very familiar to any Gmail user. That means minimal training time required for your team, and no disruptions for your customers.
It’s Time To Elevate Your Customer Support with Groove
You’ve seen the limitations of Gmail for customer support, and the potential that Groove offers. All that’s left is to make a choice: Stick with a system that’s holding you back, or embrace a solution designed to elevate your customer service.
Don’t let outdated tools limit your potential. Take the first step today by signing up for a 7-day free trial of Groove!
In just a few minutes, you’ll be well on your way to more efficient teamwork, happier customers, and valuable insights that drive your business forward. Your customers are waiting, and your team is ready. It’s time to make the move to Groove, and set a new standard for customer support excellence.